




How to make a strong neck
 Author:
 No, we're not talking about stimulating the neck muscles with repositioning or heavy deadlifts, and we certainly don't mean a few sets of half-hearted shoulder shrugs at the end of a back or shoulder workout.
A proper, direct neck workout is about as rare as a nice, deep squat at Planet Fitness. And it's not just newbies and weekend exercisers who miss the train. Even very experienced trainers skip neck training because they find it scary, unnecessary, or simply unworthy of the effort, leaving the neck neglected.
That is, until you hurt your neck.
Experienced or not, exercisers need to start giving the neck musculature the attention it deserves. The neck region consists of more than a dozen intricate muscles, layered one on top of the other, working harmoniously to ensure proper movement and stabilization of the head, and aiding activities such as shoulder movement and breathing.
Most importantly, from an aesthetic point of view, a firm, strong neck is the icing on the cake of a powerful physique.
In fact, if you're not training your neck, you're missing out. This article will show you the safest, most effective way to do it.
But first, a quick, hopefully not too boring moment of anatomy. If you're not interested in neck anatomy, skip straight to the section that starts with "Slender neck = weak neck?" but do so embarrassed by how lazy you are.
Trapeze
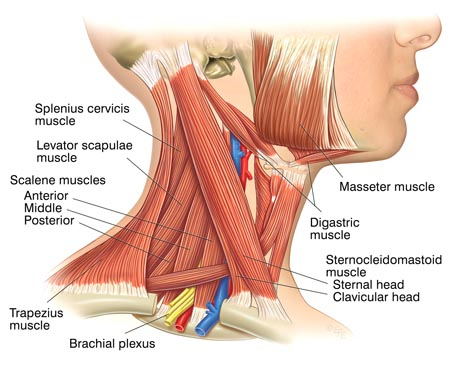
The most well-known, and therefore the most trained muscle in the neck is the trapezius. The trapezius begins at the transverse processes of the external occipital process and the nuchal ligament and attaches at three sites: the upper (clavicle, acromion), middle (crest of the scapula) and lower (base of the scapula), each of which is involved in distinct but related muscle activity.
The movement of the upper trapezius involves the lifting of the scapula and upward rotation, whereas the movement of the scapulae towards each other and their compression is responsible for the middle and lower trapezius, respectively
Scaleny(Scalenes)
Primarily responsible for the lateral flexion of the cervical spine, and secondarily serving as respiratory muscles, the scalenes (these muscles do not have an English translation), like the trapezius, consist of three parts: anterior, middle and posterior.
The anterior scalenus begins at the anterior processes of the transverse processes (third, fourth, fifth and sixth cervical vertebrae) and attaches to the scalenus in the middle of the first rib, where it helps to lift the first rib during inspiration.
The scalenus medial begins at the transverse process of the atlas and the posterior processes of the transverse processes of the cervical spine and attaches to the surface of the first rib. It also aids the elevation of the first rib, along with the lateral flexion and rotation of the cervical spine.
Finally, the posterior scalenus, which begins at the posterior processes of the transverse processes of the lower cervical spine and attaches to the external surface of the first rib, also aids in the inspiration and lateral flexion of the cervical spine.
Splenius (Splenius Muscles)
The Splenius group consists of two muscles, the Splenius Capitis and the Splenius Cervicis. The Splenius Capitis begins at the transverse processes of the first three thoracic vertebrae and attaches laterally between the lines on the scapula of the occipital bone.
Its opposite part, the Splenius cervicis, begins at the transverse processes of the next three thoracic vertebrae and attaches to the posterior processes of the transverse processes of the middle of the cervical spine. Independently, these muscles rotate the head and neck toward the contracting side while together the head and neck extend.
The scapular elevator (Levator Scapulae)
The scapular elevator begins at the transverse processes of the cervical spine and attaches to the superior angle of the scapula towards the crest of the scapula. Its primary function is to elevate the scapula when the neck is stable, and when the scapula is stable, it aids in neck rotation.
Head lifter (Sternocleidomastoid)
The head elevator is composed of two heads. The sternal head, which starts on the upper anterior surface of the sternal handle and progresses in a lateral and posterior direction, and the head, which starts on the upper surface of the middle third of the clavicle and continues almost vertically.
Both heads share attachment to the nipple-like process of the temporal bone of the skull. Each head of the Head Lifter rotates the head to a different side and tilts it upward. Together, the muscles flex the head and neck and pull them forward.
Note: As mentioned, the trapezius, scalenes and head lifters are also respiratory muscles, and in conjunction with their movement function, they are essential for sports and everyday life.
Is that all clear? Isn't it? Well, it doesn't matter.
Slim neck = weak neck?
Although it's clear to us that the term 'slim neck' pretty much corresponds with weakness, the size of our necks doesn't interest us at all. Unless, of course, their girth is so large that you need to have t-shirts tailored and they aggravate sleep apnea.
The explanation that some experienced bodybuilders will offer to justify avoiding direct training has to do with aesthetics. Specifically, that having wider waists or narrow collarbones and a narrower neck will accentuate their V shape. However, this reason does not apply to other athletes, specially not the combat or contact ones.
Recent research has shown that neck strength determines the delta V (the change in velocity the head is subjected to due to impact) and the head injury criterion, making neck training a thing worth considering in concussion prevention.
Consider that American football has the highest incidence of neck and head injuries with 40 out of 1000 games, which translates to 0.41 concussions for every NFL game. Neck training on machines has shown an increase in isometric neck strength, and neck training has also been proven successful for improving the quality of life for women with chronic neck pain..
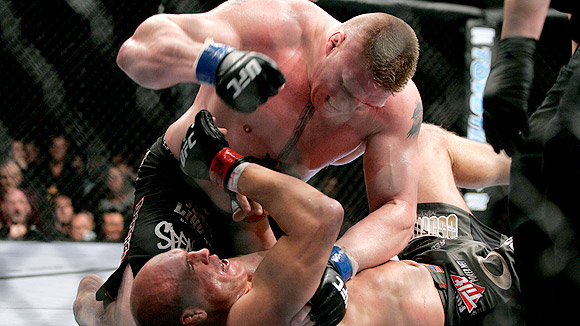
Neck bridging, often used by wrestlers, mixed martial arts fighters and other combat athletes, has stirred up a fair amount of debate over the years. Athletes and coaches alike question its effectiveness and safety, and speculate about injuries caused by the compressive force applied to the cervical spine when it is performed.
When practiced according to thorough instructions and under the supervision of a qualified trainer, one can reap the fruits of this exercise
However, neck bridging is not suitable for some individuals. For example, for those who have suffered back and neck injuries in the past. One must be aware of the fragility of the cervical spine. Therefore, trainers should look for safer alternatives
Neck bridging - Yesor no?
Training program outline
Now that you can identify the muscles of the neck, know their functions and have some of the science behind them, let's look at neck training from a practical point of view.
- In order to properly activate the neck muscles and get the cervical spine moving in its full range, we first need to train the neck to move in its full range.
- If we are not injured, following a simple plan of active, isolated and static stretching exercises will be enough to increase and maintain healthy cervical spine mobility. When mobility is restored, teaching the neck to stabilize the cervical spine becomes a priority.
- Stability and strength allow the neck to absorb the shock caused to the body and head and reduce cervical spine damage and the risk of concussion. Using partial range of motion, specifically static posture in stabilization exercises on all fours, we can effectively achieve cervical spine stability
- Finally, we strengthen the neck by using a large range of motion and different repetition schemes. Different rep schemes (low and high counts) will strengthen the neck musculature and add density, while a large range of motion will ensure cervical spine mobility.
Recommended
Nutrend BCAA 2:1:1 Powder

Czech Virus Kidney MAX
Nebbia Tílko HOMEBASE 378
Nebbia Tepláky Straight Leg URBAN 490
Programme in numbers
Let's do it! Warm up dynamically before practicing range of motion and stabilization. Focus on strength at the end of the workout. Starting at two days a week, get up to four.
Mobility and range of motion training
Upper Trap Stretch: 2 x 15-20 seconds. Watch the video.
Active, isolated stretching: Perform all exercises for 6-10 repetitions, with a two-second hold at the end of the range of motion (see "Explaining and justifying exercises" below for a description of these movements)
- Chin Tucks
- Chin Lifts
- Ear to Shoulder (left and right)
- Chin turns (left and right)
- Chin turn and tuck (left and right)
- Chin turn and lift (left and right)
Band Look Aways: 2 x 10 (left and right). Watch the video.
Stabilization
Band Neck Activation: 2 x 6-10 two seconds hold. Watch the video.
Stabilisation on all fours
Resistance of the hands, successively Medball and Swissball
- 2 x 10 seconds- Work up to 3 x 20 seconds. Once you can maintain stability for 20 seconds, progress to the next level (e.g., from Hand to Medball)
See videos for demonstrations.
The Power of
Day 1
Neck Extension, 1 x 15, work up to 3 x 25
Neck Flexion, 1 x 15, work up to 3 x 25
Neck Lateral Flexion (both directions), 1 x 15, work up to 3 x 25
Day 2
Neck Extension, 1 x 10, work up to 3 x 6-8
Neck Flexion, 1 x 10, work up to 3 x 6-8
Neck Lateral Flexion (both directions), 1 x 10, work up to 3 x 6-8
Check out the videos of these three exercises.
Explanation and justification of exercises
If you have not trained your neck before, you will only start with range of motion and stabilization training during the first two weeks of this program. This will allow your body to adapt to neck training without the need for weight bearing, thus preparing you for the strength portion of the program.
Active, isolated stretching exercises will restore length to the muscles, prepare them to work and increase range of motion in preparation for the load.
- Chin tucks are nothing more than pulling your chin to your chest (with your mouth closed), holding for two seconds, and performing a defined number of reps
- During a chin turn, you turn your chin towards your shoulder, hold for two seconds and release. Turn and lift or turn and tuck is performed by turning your head to the left or right and lifting or pulling your chin. That's how simple these stretching exercises are.
- Your posture should be upright when performing these exercises
- Band Look-Aways increase rotational range of motion and provide a bridge between range of motion training and weight training. As demonstrated in the video, wrap the mini band around your forehead and pull it to the opposite side of where you will be rotating your head. Keep the movement fluid and don't rush the repetitions.
- The stabilization portion of the program is designed to prepare your neck to take the impact. The Band Neck Activation exercise should be set up so that the miniband is attached about 90 centimeters from your body, at about knee height. The thoracic and lumbar spine must be in a neutral position throughout the performance, while the cervical spine is allowed to extend to allow the neck extensors to be pulled back to a neutral position.
- Stabilization exercises on all fours are designed to mimic the impact to the head and body. The aim of these exercises is to allow the least possible movement when an external force is applied to the head
- Starting with hand resistance will allow for a more stable and predictable environment because both hands are on the floor and the pressure applied to the head can be better regulated
- Gradual rework from 10 to 20 seconds gives an overview of progress, nothing more. Starting with two sets and working up to three increases the volume of training and allows for adaptation. As you move from one exercise to another, reduce the volume of training from 3 x 20 to 2 x 10. Always keep all parts of the spine in a neutral position during these exercises.
- All strength exercises in this program were performed on a positively inclined bench with a free disc. If you have a harness to add weights, definitely use it.
- As Jim Wendler often says, start with a weight that is probably too light for these exercises. You'll be sure you're doing them correctly and there will be plenty of room for progress.
- Start the first day of the program with a weight that is relatively light for 1 x 15 and continue with the same weight until you can easily do 3 x 15.
- Once you've done this, use the same weight for 1 x 20 and work your way up to 3 x 20 until you've worked your way up to 3 x 25. At this point, add lightly and start the cycle again.
- During the second day of the program, do it the other way around and add intensity instead of volume. This will help you improve neck density, while the higher volume from day one will increase the volume of your neck muscles.
- To start, choose a weight that is challenging but not extremely heavy for 1 x 10. Work with this weight until it is 3 x 10 light. Add on a weight that is heavy for 1 x 8 and work your way up to 3 x 8 with that weight.
- Continue with the cycle until you work your way up to 3 x 6 with the heavy weight. At that point, start with a new, heavier weight, again for 1 x 10
Notes:
The weight you use for neck extensions and neck flexion may be slightly heavier than the one you use for neck lateral flexion. Also note that although all the videos show how to train the neck, no problem has just one solution
Use your head to train your neck
Neck training should be an integral part of your training program whether you are an athlete or not. It's important for reducing the risk of concussion, for protecting your spine, and for keeping your head upright while everyone else is looking at the ground. Because in life, as in sports, you need to keep your head upright and what you can't see, you can't hit.
Special thanks to Wesley Showalter and Justin Assadini of the Penn State Rugby team for demonstrating the exercises you can see in the videos in this article.
Support your performance with quality supplementation!
In our shop you can choose from a lot of proteins, gainers, amino acids(bcaa, glutamine, ...), vitamins and minerals, creatines,fat burners and much more. So don't hesitate and step up a notch!
Sources:
1. De Troyer A. Respiratory muscle function. Respiratory Medicine. 2003:119-129.
2. Ramesh RT, Vishnumaya G, Prakashchandra SK. Variation in the origin of sternocleidomastoid muscle. A case report.Int J Morphol 2007;25(3):621-623.
3. Kendall F, McCreary E, Provance P, Rodgers M, Romai W. Muscles: Testing Function with Posture and Pain,5th Edition). Baltimore, MD: Lippincott, Williams, & Williams; 2005.
4. Davies RJ, Ali NJ, Stradling JR. Neck circumference and other clinical features in the diagnosis of obstructive sleep apnea syndrome.Thorax. 1992;47:101-105.
5. Viano DC, Casson IR, Pellman EJ. Concussion in professional football: biomechanics of the struck player (part 14).Neurosurgery. 2007;61(2):313-328.
6. McIntosh AS, McCrory P. Preventing head and neck injury.Br J Sports Med. 2005;39:314-318.
7. Burnett AF, Naumann FL, Price RS. A comparison of training methods to increase neck muscle strength.Work. 2005;25(3):205-210.
8. Burnett A, Coleman J, Netto K. An electromyographic comparison of neck conditioning exercise in healthy controls.J Str Cond Res. 2008;22(2):447-454.
9. Ylinen J, Takala E, Nykanen M. Active neck muscle training in the treatment of chronic neck pain in women. A randomized controlled trial. J Am Med Assoc. 2003;289:2509-2516.
Translated by Jaromír Uhlíř.
No posts have been made yet.